Saturday 28 March 2015

Found rabbit..

Hello everyone,

I found a picture of a rabbit or possibly an Easter Bunny in a flyer that landed in my letterbox. I was a fashion flyer. Not sure how rabbits and fashion are related but I thought the picture was so nice I had to used it. I made a real quick art journal with it:


Isn't that a magnificent rabbit ? All I did with it was adhere it to a blank page in my journal and when it was dry I tried to match the colours with paint. When the page was painted I added some stencilling and stamping and that was it. 

Thank you for stopping by ! 

Friday 27 March 2015

One way...

Hello everyone,

I am still struggling somewhat but I think Mr. Mojo might be on his way back. Today I had a good time in my craft room and I made another postcard. I am totally addicted to making postcards. They are so much fun, not too big, easy to handle !

The postcard already had the model paste on. I did a few this week and this was on of them. 
I used Lindys Stampgang Flat Fabios to colour the card. I did use some distress Ink as well on the edges. They are just that little bit brighter now.  I also splattered the card with the same colours and some white. Next I stamped the background with grey Archival ink and went around the edges of the card with black Archival ink. 
I love the Tweedledee and Tweedledum stamp and that's why I have used it again today. They were stamped on white card stock and coloured with Copic Markers. I clear embossed the image after colouring. I think the colours come out just that little bit brighter. 
I also stamped both sentiments. 'Wanderlust' on a piece of a menu a took from a restaurant because the colours were so beautiful and the 'one way' on white card stock. I also clear embossed these. 
The whole think was then put together. 

I used the following stamps (all VLVS!)


Thank you for stopping by ! 

Thursday 26 March 2015

Steam punk (ish) tag

Hello everyone,

The Challenge this month over at the Art Journey blog is any colour but black. That is actually more difficult then you think..
I made this tag in blues and copper.


This was a #8 Manilla tag that I painted with licht blue acrylic paint. After this dried I used a blending tool and some dark blue ink to make the edges slightly darker. I stamped the steam punk man on the tag with Versamark and on some sticky paper with black ink to make a mask. I heat embossed the one on the tag with copper embossing powder. I also stamped the sentiment with Versamark and heat embossed this with the same copper embossing powder too. 
Next I put the mask on and stamped the Ripple stamp several times, after each time embossing it with different shades of blue embossing powder and once with white. I also put the darkest blue embossing powder around the edges of the tag and embossed this too. I though this gave a nice finish. 
The last thing I did was put a brown and copper/gold ribbon through the hole and that was that. 

I used the following Art Journey stamps :

Ripple 
Steampunk 3 

Thank you so much for stopping by today ! 

Wednesday 25 March 2015

Welcome to my reality

Hello fellow Crafters,

and happy Wednesday to you !
Over at the Stampotique Designers' Challenge blog the new Challenge has been set b the lovely and talented  Nellie and she wants us to use our favourite background technique. This is what she had to say :

"What's your favourite technique to make backgrounds? I love making backgrounds with distressink on a crafsheet. Quick and easy and yet a different result all the time."

For me my favourite background technique is different every time ! lol But at the moment I quite enjoy the technique that I have used on this week's art journal:


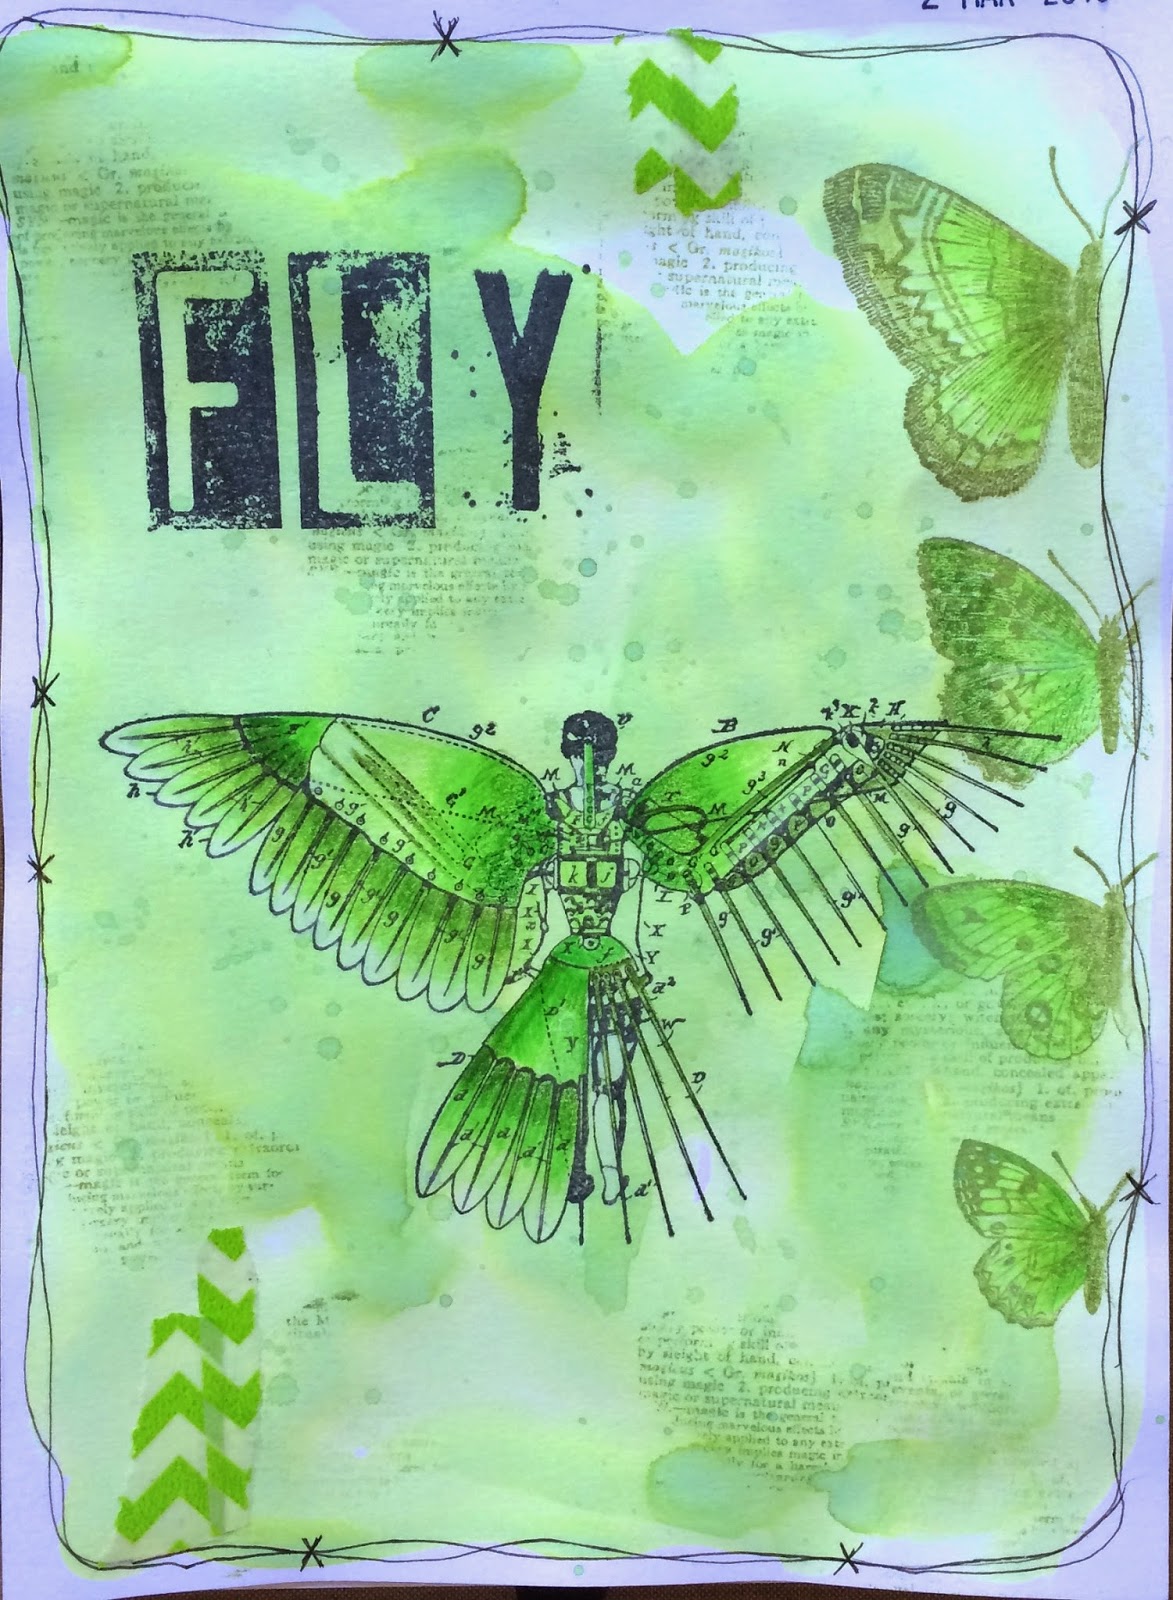
This art journal was started with a piece of white paper. I used a stencil and some model paste to add some texture along the sides. I then used my favorite ink sprays which are Lindys Stampgang. I used Flat Fabios which means as much as there is no sparkle. 
I kept spraying, dripping and drying until I was happy with the result. Soo pretty ! 
I then randomly stamped the background. 
Next I stamped the gnomes and the bird on white card stock, coloured them and cut them out. The wall was stamped on pattern paper (Kaiserkraft) and lightly shaded and cut out. 
I then painted the speech bubbles, doodled around the edges and stamped the sentiment on them. Everything was then arranged on the page. 

Why not play along with us this week, you never know, you might win one of the $30 vouchers at the end of the month. Just remember you can't use Digi Stamps and you can only enter every challenge once. 

I used the following stamps, all from the new release:


Thank you for stopping by today ! 

Hope I gave you some inspiration...

Tuesday 24 March 2015

And I am unanimous in that !

Hello fellow Crafters,

For my DT post for VivaLasVegaStamps! I have made an art journal for you today and this is it : I wonder what they are talking about ? ...


The base is a Gelli Print. I cut it to size before adding some background stamping and inking the edges with Black Soot Distress Ink. 
I keep using this plate as it is so fabulous for art journaling. It is, of course, plate 1455. I will list all stamps I used at the bottom of this post. One of the stamps I used, I actually used VersaMark and white embossed it as I thought all black would be a bit ..... well, too black ! 
Next I stamped the Polaroid on white card stock and masked the bottom and right hand side of the frame. I then stamped the 'gossiping ladies' and the 'And I am unanimous in that' inside. I clear embossed it twice after colouring with my Copic Markers. It almost looks like a real photo now. 
It was adhered on the page with glossy accents. I added some washi tape for more interest. 

I used the following stamps :

19575 - Stitching (plate 1455)
19569 - Mesh Texture (plate 1455) 

Thank you for stopping by today !

Corrie x

Saturday 21 March 2015

Angel

Hello everyone,

I have made a tag today which I shall be entering into the Tag Along Challenge of this week. The theme is Angels and was set by my lovely friend Kay. 
I am suffering with lack of Mojo at this moment. I was going to do a lot this week but haven't managed to come up with much at all... Eek. Hopefully Mr. Mojo will return soon. I tried to kickstart myself with this tag and hope it has worked...


I started with a #8 tag which I painted with white gesso. After this dried I sprinkled some yellow and orange Brusho's over it and then used a clear gesso instead of water to get a result that is more predictable. The unpredictability of the Brusho's is exactly what I don't like. So when I read on the internet somewhere that you can mix them with gel medium and gesso etc. I thought I'd try it before I completely give up on them. I like this a lot better. 
Anyway after that dried I put my Gothic TH stencil on and sprayed orange Delusion spray through it. This gave this diffused effect which I quite liked. After it dried I put the stencil back on and dabbed embossing ink through it on the top right and bottom left. I heat embossed it with copper embossing powder by WOW. I also embossed the edges of the tag in the same way. 
Next I stamped Stampotique's 'Angel Boy' and one of the words of the 'Tall word collage' on white card stock, clear embossed them and coloured the angel with a combination of Copics and watercolour pencils. I re-embossed the wings after colouring with clear embossing powder.
Both were cut out and adhered to the tag and lastly I added a piece of ribbon. 

Thank you for stopping by ! 

Friday 20 March 2015

Art journal

Hello fellow Crafters,

For my DT post for Lost Coast Designs, I have made an art journal. I have used my favourite colour combination of orange and pink !


The page has been coloured with Gelatos over gesso. I then sealed it with clear gesso. Next I used embossing powder and a stencil with an embossing ink dabber to create the pink and orange squares. Next I adhered some circles which I cut from a gelli print and stamped rings around them with a bottle cap. Then the background was stamped with grey and black ink and I splattered some white india ink on the page. The girl was stamped on book text and lightly coloured. I adhered her on to the page on top of some washi tape. A couple of lines around the page finished it off. 

I used the following stamps:

Manga Goth with boots
Loopy Calligraphy
Dream Dictionary 

If you are interested in these lovely stamps, you can get them here:

www.Inkadinkadutchies.nl ( if you live in Europe) and 

Thank you for stopping by today ! 

Hope you like it...


Thursday 19 March 2015

And the winner is .......

Hello everyone,

Today it was time to choose a winner for my give away. I used the scientific way and here is how :


First I cut out all the comments.....


Next I folded them all up and put them in this little box...


Then I just grabbed one ! 


Congratulations Alie ! Please send me your address via the 'Contact me' form on the sidebar on my blog and the give away will come your way ! 

I have also enclosed a little surprise that is not in the photo ! 


Thank you for stopping by today ! 

Corrie x


The Kat(zelkraft) is out of the bag !!!

Hello fellow Crafters,

I am delighted to tell you that I have been asked to join the Katzelkraft DT.
Katzelkraft is a French company specialising in unmounted rubber stamps. They have got a great collection of stamps.

For my debut I have altered a bird house.


I started with two layers of Gesso. I then applied model past through a flower stencil. Sorry forgot to take a photo. 


Next I coloured the house with Spray inks. The bottom ridge was painted with black gesso.  I then used a clear gesso to fixate the colour as these inks are reactive with water. 

The next thing I did was stamp the images I wanted to use on white card stock. I coloured them, cut them out and used a layer of clear embossing powder over the top. This makes the colours a little brighter and gives a nice shine. I also added glitter glue to the wings of the dragon fly. The word 'libellule' was stamped on tissue paper and adhered to the birdhouse with gel medium. This is a great way of getting your stamped images on difficult surfaces.

I used the set KTZ76 


This is the finished result after I put it all together. I used some metal wire to add the butterflies and the flowers and dragonfly were adhered with glue and dimensional adhesive. 


View from the side, you can just see all the model paste..


Detail of the glitter on the dragonfly's wings. 

That was my first DT project for Katzelkraft. I hope I have given you some inspiration to get those stamps out !

Corrie x


Wednesday 18 March 2015

America

Hello everyone,

I am back and slowly trying to get into the crafting mojo again... To start small I made an ATC for the Challenge over at the Stempelwinkel HERE. The theme is 'Fly away'.
After winning the Challenge a few weeks ago I had to play again...


The ATC was coloured with an Ink spray. I used a stencil for the butterflies. Next I stamped the flying man (plate 135) and clear embossed him. The word America is a bit of Tim Holtz tissue paper. I imagine he is on his way to America. It will be a long 'bike' flight ! :) 
Lastly I did some more stencilling with a polkadot stencil and turquoise ink and use a white pen to accent some bits of the butterflies and the wings of the flying machine. I also took my black Archival Ink pad and rubbed it around the edge of the ATC. 

Thank you for stopping by. 

Neon !??!!?

Hello fellow Crafters,

And a warm welcome to you on this lovely Wednesday. It is time for another Challenge over at the Stampotique Designers' Challenge blog. This week's hostess is the lovely Astrid and this is what she said:

"At first I was a bit afraid if these intense colors, but after using them I really love them. They give your work such a nice 'pop'. I challenge you to use at least one Neon color. Can't wait to see your eye popping work :-)"

And a challenge it was as I don't really like Neon colours. So after searching high and low for something neon I found some tape for a Dymo Labeller in Neon colours.  So I made a postcard. I am not convinced, sorry Astrid.....


I started out with a postcard and painted it white. I then used a background stamp over the whole thing and used the same ink pad to ink the edges of the card. I then stamped Friend with Versafine ink and clear embossed him.  Next I chose a heart die and cut three bits of paper that were big enough to be die cut with this heart. I then glued the tape on the bits of paper and when the glue had dried, (yes, I used glue as the stuff didn't want to stick on it's own) I die cut three hearts. 
Next I arranged the hearts on the card and adhered them. With a Big Brush Marker I shaded around the hearts and then also took a fine tipped pen and drew around the hearts and also around the card. I then stamped the sentiment and it still didn't look balanced. So I took the barcode stamps and randomly stamped it around the edge. 

I used the following stamps :


Wednesday 11 March 2015

50 Shades of GREEN Blog Hop and Giveaway !

Hello everyone, 

and welcome to the Lost Coast Designs

"50 Shades of GREEN" 
Readers Progressive Blog Hop Giveaway!
Win a $20 gift certificate to spend at Lost Coast Designs!

The Lost Coast Designs DT will kick off 
the hop on March 11 (My birthday, yay !!!) at 11am PST, which is 8.00 PM in Europe.

Hop our blogs to get inspired and then come and join the fun!
Here is my Art Journal:


It is very green. Tell you a secret; I really do not like green. In fact I do not own one piece of clothing in green. I also have not many paints and inks in green, so this was a bit of a challenge !
I was made with Lindy's Merry Go Round Green Flat Fabio Spray and Lost Coast Designs Stamps. I also used black and green ink to stamp, white paper in my journal, some green washi tape and my Polychromos Colour Pencils to colour in the Winged Girl. 

Members of the Lost Coast Design Team kick off the hop today at 11am PST so pop on 
over, hop all the blogs, get inspired and join the fun!  Link up your own Shades of GREEN projects from today through to March 30 and keep the blog hop rolling!  Visit the Lost Coaster’s Review blog for all the participation details HERE. The winner will be announced on March 31 and some Honourable Mention blog badges are up for grabs too! 

The hop will close at NOON PST on March 30th and the winner announced on March 31st! 

One winner will be selected from all the entries & win a $20 gift certificate to spend at Lost Coast Designs!  There will also be some Honourable Mention blog badges to give ! 


Star Light....

Hello fellow Crafters,

It is Wednesday and that can only mean one thing : A new Challenge over at the Stampotique Designers's Challenge blog. 

But wait, there is something else..... It's my birthday ! Yay !
I will be spending a few days with my sister in law & brother in law which will be nice !

Anyway today's host is the lovely Carol and she wants us to use one or more stars. This is what she said:

"Feature stars this week, one or more on your arty creation. As part of your background or a main feature it's up to you. Just Have fun with the challenge." 

I have made an art journal for Carol's Challenge. 


I tried to create a night sky and used Pan Pastels for this. I stamped the background, although you can't really see that and used a stencil and a whit chalk ink, which was subtle but not as subtle as in the photo. When the ink had dried I used a fixative also to fix the white ink as I wanted to put a layer of clear gesso on. If you don't use a fixative the ink will smear. (I needed the gesso so that I could shade the stars after I glued them on.) 
I drew a star and cut it out five times out of Pattern paper (Bo Bunny - C'est la Vie). I glued them on the page with gel medium and then shaded them with Big Brush Markers. I also used a white paint pen to draw some more stars. 
The rabbit was stamped on white card stock and coloured with Copic Markers, cut out and adhered on some washi tape. I made the sentiment with my old typewriter. 
That was that ! 
I used stamps from the new release:

Why not play along with us this week and maybe you will win one of the two $30 vouchers at the end of the month. Just remember, no digi's and only one entry per person per challenge.

Thank you for stopping by ! 

Hope I gave you some inspiration ! 


Tuesday 10 March 2015

Imagination

Hello fellow Crafters,

There is a new Challenge over at VivaLasVegaStamps! This is the Inspiration Board :


I made the following postcard based on this Inspiration Board:


I used the following elements of the board: White - neutral - stripes - Music Notes - Black - Writing - Birds - Splatters - Tape - Triangles. 

I started with a piece of white card stock. I glued some Tim Holz tissue paper on the bottom and the top right. I covered the whole card with clear gesso. I then used Antique Linen Distress Ink, a blending tool and a piece of paper to mask, and created the stripes. Next I coloured a piece of ruled paper and coloured it with the same Distress Ink. I used a Die (Tim Holtz) to cut out the triangles. I glued these on the card and doodled around them with a black pen. Next I stamped the 'writing triangles' on this paper. The bird was stamped next and I clear embossed him. The last things were the word 'imagination' and a few pieces of washi tape. 

I used the following stamps :


This was so much fun to make, why not play along with us ! You never know, you might just win a grab bag of rubber for your piece ! 

Thank you so much for stopping by ! 


Monday 9 March 2015

All roads lead to the ocean

Hello everyone !

Today I have a postcard to share. I used two of my new Stampotique stamps (the mermaid and the birch tree) for this.


I started with model paste through a stencil and after it dried a thin layer of gesso. Next I used Lindy's Stampgang Flat Fabios (sprays without sparkle).
I am totally hooked on this colour combo of greens and blues and I used "Merry go round green" and "Tilt a wheel teal" for this card. I randomly stamped the background with grey Archival Ink and the 'Vintage bill' stamp. 
Next I stamped 'Smushasha' on white card stock and coloured her with a combination of Copic Markers and colour pencils. The seaweed was created by stamping 'Birch tree' several times on vellum and colouring the back of the vellum with a green Copic Marker. I cut all the trees out, cutting some of them apart. Lastly I stamped the sentiment, 'Ocean text' also on vellum and then adhered everything on the card. 

I used the following stamps (all Stampotique):


Thank you so much for stopping by ! 

Sunday 8 March 2015

Spring nap

Hello fellow Crafters,

Today I have a card to share that I made for the March challenge over at Indigoblu. The theme is Sping Greens. I thought it would be a nice idea for George to have a nap in the grass while he is enjoying the Spring sunshine !


I stamped George first and masked him and then stamped the grass. I coloured these with colour pencils. I then stamped the tree and then used Distress Inks and a blending tool to colour the background. Next I also used some colour pencils to accentuate bits of the tree. I also restamped the little bird on the tree stamp a few more times. Lastly I stamped the butterflies with Distress Inks in the same colours as the background. 

I used the following stamps:
Nature 1
Sleeping George 

Thank you so much for stopping by today ! 


Saturday 7 March 2015

Something different (for me)

Hello everyone !

My good friend Kay is very keen on Edgar Allan Poe and is part of the DT of the Challenge blog Quoth the Raven Nevermore. I quite like the idea of Poe and thought it would be fun to play along this month. The theme is "Dream on". I made an art journal.


I glued a piece of  pattern paper in my journal after I coloured the edge of the page black with a Copic Marker. This forms a nice border around the page. I used pattern paper for the background that I distressed with Fresco Paint. I used Sage, which is a grey-green colour. I also put some of this paint on the black border. Next I stamped Poe. He is a rubber stamp from Carmen's Verandah which is sold by Lost Coast Designs. I coloured him with Copic Markers. 
I adhered him to some book text and tore around him. I also put some of the Sage paint around the torn edge. The sentiment is a quote by Poe and I typed it on my old trusty typewriter on the edge of the same book text.

It says :

'Deep into that darkness
peering, long I stood there,
wondering, fearing, doubting,
dreaming dreams no mortal
ever dared to dream before'

 I also rubbed some Sage paint around these strips. After glueing them to the page I doodled around them with a black pen. 

That was it ! 

Thank you for stopping by ! 


Happy Spring

Hello everybody !

I made a tag to play in the Tag Along Challenge of this week where the theme is Spring.


The tag was painted with Fresco Paints. Pink and white. I then stamped the background and went around the edge with an ink pad. Next I doodled around the edges with a black pen. 
The big butterfly is from Donna Downey Unity Stamps and I stamped it with Versamark on white card stock. I heat embossed it with black glint, pink glitter and normal pink embossing powder. I Love the shimmer it gives. I also used the same black pen to fill in all the white from the butterfly. 
The sentiment was made with TH stickers. I used some ribbon as embellishments by stapling them on the tag and used the same ribbon to put through the hole.

Thank you for stopping by ! 


Thursday 5 March 2015

Enchanted

Hello fellow Crafters,

I really love playing in the different challenges that are around on the internet. For the March challenge over at Crafty Individuals with the theme "the animal world" I made a mini canvas. It was great fun to make..


I started with model paste and then gesso. After it was all dry I painted the little canvas (10 x 10 cm) with blues and greens and a little white. I went around the edges with a Pitt Big Brush Marker. Next I stamped the background with a textstamp. I then stamped the bunnies by Alice Palace on book paper and coloured them with my Polychromos Pencils. (I am learning, slowly !) I cut them out with a little border so they would stand out more on the canvas. I adhered them to the canvas with gel medium. Next I stamped the sentiment and doodled around the letters with a white paint pen. The last thing I did was add some liquid pearls and some twine and that was that. They are such a cute pair, don't you think ? 

Thank you so much for stopping by ! 

Wednesday 4 March 2015

Stampotique Challenge #185

Hello fellow Crafters,

and happy Wednesday to you. Today it is Jackie's turn to host the challenge over at the Stampotique Designers' Challenge blog and the theme she chose was : use numbers. This is what she had to say :

"Numbers have been around for a very long time! They feature so much in our lives! I would like you to incorporate a minimum of one number into your project! I hope you have fun."

I have made a tag for this challenge and I had a lot of trouble with it... Luckily it all came together in the end. 

I thought I'd use some canvas today for something different. So I started by glueing the canvas on a tag. I made sure the gessoed side was on the bottom because I wanted to use my Brusho's. I haven't used them very much because I hate the unpredictable outcome. LOL. Anyway this time it was the same. I really didn't like the outcome so I painted it over. I used gesso first, al few layers to get rid of the colour bleeding. I then painted it with a light blue. The numbers were made by using a white chalk ink and a stencil. I then sprinkled white embossing powder over it and heat embossed it. Much better ! Next I stamped the background and also went around the tag with my Archival ink pad. 
I then stamped the girl and the dog and coloured them with Copic Markers, cut them out and adhered them on the tag on top of some washi tape to ground them. I used a few bits of the washi tape at the top to have a bit more balance. That was it ! 
I used stamps from the New Release from Stampotique :


Why not play along with us ! You never know you might just win one of the two $30 vouchers at the end of the month. Just remember, no digi's and only one entry per person per challenge! 

Thanks so much for stopping by ! 

Hope you like it...

WARNING...

Hello fellow Crafters !

Today I would like to share an extra terrestrial  Art Journal that I have created for VivaLasVegaStamps!

I have lots of photo's to show how I did this so get yourself a nice cup of tea or coffee and join me:

I will start with the finished project :


And here's how I did it: 


I painted my page with gesso.


I then used a stencil and model paste to create a 'wall'.


Here is it,  I wasn't worried about the blue stains from the stencil as I was going to paint over it anyway ! 


I painted the page with white for the wall and blue around the edges, trying to make it blend into each other.


Here is a close up of the painted 'wall'.


Next, I used a Faber Castell big brush Marker to make the 'grouting' of the 'wall' stand out more. 


Onto background stamping now. I used the fabulous journaling set ( plate 1455 ) and blue, grey and black Archival Inks. A complete list of all the stamps I used will be at the bottom of this post. 


Here is the result. I did add some more towards the end...


I then stamped the Area 51 Warning on pattern paper with Archival ink and the cute little alien on white card stock with Memento Ink as I was going to colour him with Copic Markers.


I distressed the edges of the poster and used a blending tool and Pumice Stone Distress Ink to go around the edges to make it look old.  I cut out the alien but discarded the text that is around the circle as this was impossible to cut out and very difficult to stamp separately onto the 'wall', as you can see underneath the alien. 


And here is the finished result. I did stamp the word 'warning' from the Area 51 stamp a few more times by scribbling on it with a green Big Brush Marker. I also used black and white India Ink and did some splattering ! 

I used the following stamps:


Thank you so much for stopping by today ! 

Hope I gave you some inspiration ..


Tuesday 3 March 2015

Tim's Tags March

Hello fellow Crafters,

This is my second post for today and it is my take on the March tag of the 12 tags of 2015. I had to improvise as I don't have all the supplies that Tim used.
Anyway here it is :


This was way out of my comfort zone as I usually only use one or two colours. But, as I was doing it and saw the result I thought it turned out quite nice.. 
I used different  acrylic paints and water on my craft sheet and dragged the tag through it. I did two colours at a time. So, blue and green first, dried it, then pink and orange. I didn't want to make mud you see. I dried all this with my heat tool and then stamped the winged girl (TH-Winged things - CMS024) on the tag and clear embossed it. I then realised that I forgot the washi tape. Haha... So I used a stamp and grey ink to create a similar effect. (TH- Paris Memoirs CMS 159). I used one of Tim's layering stencils to create the numbers and sprinkled them with silver embossing powder. I let it dry and then heat embossed it. I went around the numbers with a black pencil as I wanted them to stand out a bit more. I used a metal heart, which I silver embossed and distressed with black Archival Ink, a chit chat sticker, som ribbon and a die cut heart from pattern paper to make the sentiment. 
A piece of lace ribbon through the hole finished it off ! 

Thank you for stopping by ! 


Something fishy going on !

Hello fellow Crafters,

This is my first post of today and it is a card. I love playing in challenges when I have the time. Today I had time so I made a card for the 'Silhouette' challenge over at the Stempelwinkel:
I don't have many stamps from the Stempelwinkel and I might buy some more as they have a lovely collection. For this card I had to improvise :


I started with model paste through a stencil and when that had dried I coloured my cardpanel with Distress Inks and then dripped some water over the top. I then used the bubble stamp in the same Distress Ink colours to make the background more interesting. I also rubbed a black ink pad around the edges. Next I stamped the fish and I must say I thought it was a real shame to have to colour them black to turn them into silhouettes but that was the challenge.... The sentiment was typed on my old fashioned typewriter. I doodled a bit and used a white pencil to highlight the bubbles here and there. I then matted the panel on black card stock and then on a white card. 

That was it ! 

Thank you so much for stopping by !